Showing posts with label Easter. Show all posts

Monday, March 21, 2016

Easter 2016


Each year I try to do a little Easter Craft. I was pretty excited to make these cute fella's this year.
These will serve as our Easter baskets this year. Each girl can put out the bunny pillow to be filled.
Pattern found via Willowday


Past Projects Here: We still have and display some of these
Fleece Bunnies  (gah how cute was Miss N!)


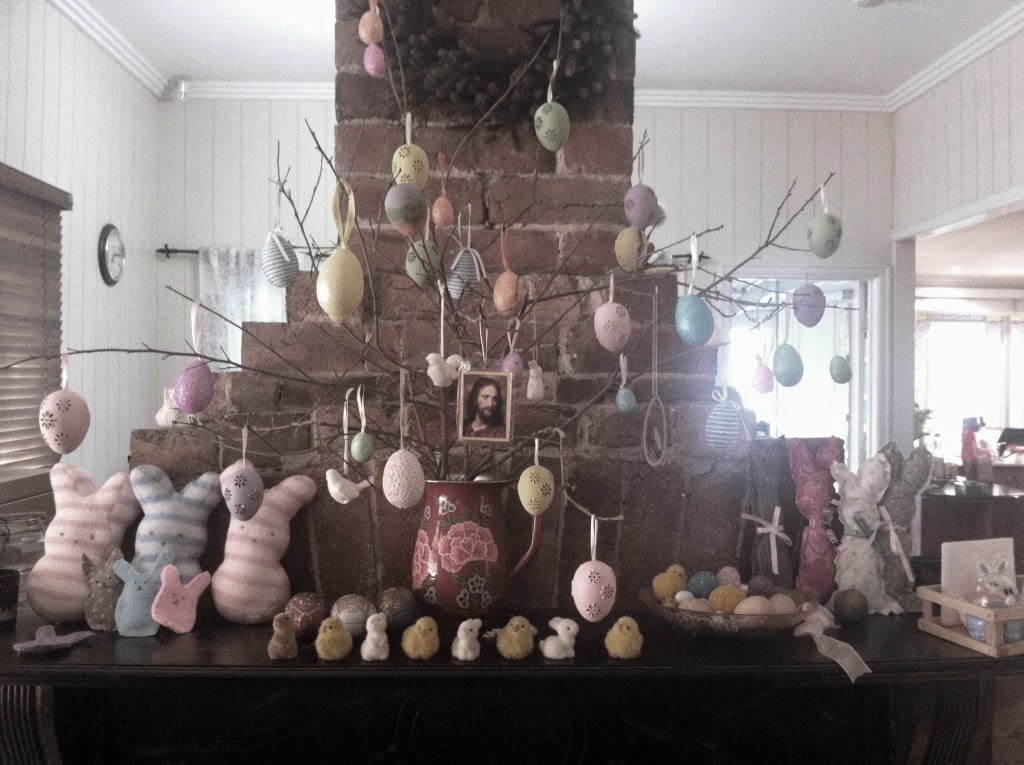
Easter Tree Decorating 2016


Because its a tradition for me to photograph it. They were so tiny once doing the same thing.

2015

2014

2013


We made Onion Skin/ Serbian Eggs again! I love the process. Tutorial Here


We've also got our wheat grass tomb blooming.   Tutorial Here

And thats it for this year. I'll add more if anything special happens :)

Sunday, March 29, 2015

2015 Easter Tree


Just because its tradition.
Why stop now?
And black and White to be dramatic :)


Note: the fabric bunnies we've made over the years are getting out of control.
The cutest tiny ceramic bunnies were this years addition. They are hard to see on the tree. But they are adorable. We also broke a ceramic bird, must get more. Those are my favourite.

Previous years here:

2014

2013


Imprinted Onion Skin Eggs/ Serbian Orthodox Eggs


Last Easter a sweet friend taught us her family's (Serbian) tradition of dyeing Easter Eggs.
It was so wonderful, I was excited to try it this year.
I really enjoyed sitting around with her family making these last year.

Each time I visited the grocery store I cleaned up around the onions and put a few skins in a bag and bought them home. 3 visits and I had enough onion skins saved up. Or just ask at your local fruit and veg, I'm sure they will be happy for you to take them.


What you need:

Onion skins
1 litre of water
4 tablespoons of white vinegar
4 tablespoons olive or vegetable oil
1 dozen eggs
pretty leaves, herbs such as coriander and rosemary, flowers
clean stockings

Put onion skins, water and vinegar in a saucepan and bring to the boil.
Allow to cool and remove skins.

Cut stockings into pieces big enough to surround an egg and tie a knot.
Place leaves, herbs, flowers onto eggs.
Carefully place into stockings and tie knot tightly around egg
Flowers/leaves may have moved, use your fingernail, or toothpick or like to gently push leaves into back into desired position

Place eggs in pot and cook.
Allow to cool and remove stockings and leaves/herbs/flowers

Now you will have cool imprints left behind on the eggs.

Shine your eggs with a bit of olive oil and paper towel.


We are just displaying our eggs, so it didn't matter what foliage I used.
But if eating the eggs stick to things you know are safe to consume.
The tying the stocking around the egg can be fiddly and frustrating to small children.
Best to get the adult/older children to do this. My smaller kids helped in all the other stages.

In Serbia, the first dyed egg is kept until next Easter, guaranteeing family security and health. All the rest hard boiled dyed eggs are used in a traditional game, known as egg dumping, where each player hits the other players' egg with their own. The winner is the holder of the last intact egg. The losers get to eat their eggs. This is a common practice in all Christian Orthodox countries on Easter Sunday.

 A real chicken egg, hard-boiled and dyed or decorated, takes the central place in the Easter celebration. Eggs symbolise the eternal life of Jesus and according to some legends, the white eggs Mary left on her son’s grave as a sacrifice turned red after his resurrection.


I've still got the onion water, the neighbour kid loves our eggs she wants some too.
I'll just have to get more stockings. Water can be reused over and over.

I just love the simple natural method of these eggs.
Almost felt like how people did things in the old days.

Enjoy.


Sunday, March 8, 2015

FHE Lesson {Easter Lessons}

Assembling the 2015 Easter Tree


I have more Easter FHE Lessons than weeks before Easter.

I am compiling them all here for easy reference.

Thank you to all who use these lessons! {Lots of you! I'm honoured!}

I enjoy writing them for you.


Sunday, April 20, 2014

Easter Tree 2014


It's a little simple tradition. Decorating sticks we've collected from the back yard or park.

This starts the Easter Season in our house.

I like to document the kids hanging a decoration, however it is very tricky to photograph.

Not to mention we did this back one Monday night, all dirty from the day still in school clothes.

But oh well my life isn't a fashion magazine I suppose.

I've got photos of them doing this for about five years now. Its the simple things.


Surprise eggs, Smash eggs, Carscerones

Ready to smash


Whatever you call them they are pretty fun.

One of the Easter things my kids ask for most is dyeing eggs.
The last few years I've combined our surprise eggs and dyeing eggs because we don't usually need that many hardboiled eggs.


If I can remember while cooking instead of cracking an egg open, I slice the top off and pour the egg out. Rinse the egg shell and keep to the side. Repeat until you have enough eggshells.

Using food colouring, water and a little vinegar dye your eggs. Let Dry.

Fill eggs with - confetti, bird seed, glitter, whatever, {this year I used wheat!}

Seal the hole up by glueing 2 layers of tissue paper over the hole.

When dry trim the tissue paper neatly.


Turn eggs over and display.

To play give everyone an egg to smash over the top of someone else.
{use your hands to smash it - don't directly hit people with the eggs!}

It's a symbol of good luck!


Have Fun! You better Run!


Next year I must make more. The kids breezed through these in no time and loved it.

Saturday, April 19, 2014

Egg Shell Candles {Tutorial}


There are so many Easter Traditions we didn't get to do this year. Boo!
But we have been doing this one a few years and it made a great Sunday afternoon activity with friends last week. The kids enjoyed burning these at dinner.


:: Egg Candles ::


Cut up any old candles but ensure you keep the wick.

Melt cut candles in a saucepan
Use an old saucepan. It may never be the same, the wax will remain.
We have a really old one the kids play with in the garden

Pour melted wax into egg shells.

Leave to cool.

Before wax sets place/push a small piece of the wick in the middle of the wax.

Hold wick inplace till hard/wick can stand up alone.
Try to keep wick tall and straight away from the walls of the egg.


#note. These are small candles and won't burn for long. During dinner or an Easter devotional only.  Also note the eggshells can/will get hot and if the wick is too close to egg shell it can burn.
Be vigilant and keep watch. Be careful with fire and children.

Tuesday, April 10, 2012

Easter 2012

It's been easter overload here on the blog the last few weeks.
So I promise this will be the last Easter Post!

We had a quiet leisurely Easter that seemed like we did nothing....
we stayed home most of the weekend
{I was feeling bad for not organising a holiday or camping or fun things to do!}

but the photos tell another story. Phew!


Hope you had a Happy Easter!


Friday, April 6, 2012

Suprise Eggs


After a month of attempting to collect every eggshell I cooked with (some didn't make it)
I had about 30 eggs to play with to make our surprise eggs.


To make surprise eggs:

When cooking just slice the top off the egg to preserve more of the eggshell.
{alternately you could blow the eggs but I find that too much work and too many eggs to use up at once}

Leave plain {like here } or decorate.
This year we decided to dye our eggs.
We used a few lidfulls of food colouring, a cup of water and 1/4 cup of vinegar for each colour

When dry fill with birdseed, confetti, cereal, glitter or anything small.
This year we tried birdseed for the first time. Very good!

Glue 2 small disks of tissue paper over the hole on each egg.

When dry turn over the other way so it is not visible in your egg carton

Enjoy having an 'egg fight' with family and friends and smashing them over your head.


or you end up doing a funny dance with your hands in the air
{To avoid hurting eachother I make the kids smash the egg in their hands a little before throwing it}


Wednesday, April 4, 2012

Pretzel Bunnies


We have made soft pretzels for Easter for the last four years.

Usually we do the regular pretzel shape (as it is to be said the shape of arms folded in prayer - and we talk about Prayer and Christ Praying in Gethsemane for us)

This year we made regular pretzels but we also made these Bunny shaped ones. Easy and Cute


I found the original idea  here in the April 2011 friend magazine

Here's how to do it:


I use this recipe to make our soft pretzels
(though be careful with the bicarb - I use less as the taste is quite strong)

4 teaspoons active dry yeast
1 teaspoon white sugar
1 1/4 cups warm water (110 degrees F/45 degrees C)
5 cups all-purpose flour
1/2 cup white sugar
1 1/2 teaspoons salt
1 tablespoon vegetable oil

                    
1/2 cup baking soda
4 cups hot water
1/4 cup kosher salt, for topping

In a small bowl, dissolve yeast and 1 teaspoon sugar in warm water. Let stand until creamy, about 10 minutes.            
   
In a large bowl, mix together flour, 1/2 cup sugar, and salt. Make a well in the center; add the oil and yeast mixture. Mix and form into a dough. If the mixture is dry, add one or two tablespoons of water. Knead the dough until smooth, about 7 to 8 minutes. Lightly oil a large bowl, place the dough in the bowl and turn to coat with oil. Cover with plastic wrap and let rise in a warm place until doubled in size, about 1 hour.               

Preheat oven to 450 degrees F (230 degrees C). In a large bowl, dissolve baking soda in hot water.               

When risen, turn dough out onto a lightly floured surface and divide into 12 equal pieces. Roll each piece into a rope and twist into a pretzel shape. Once all of the dough is all shaped, dip each pretzel into the baking soda solution and place on a greased baking sheet. Sprinkle with kosher salt.               

Bake in preheated oven for 8 minutes, until browned.               

(we used currants for the bunnies eyes)


here are our regular shaped pretzels.


Saturday, March 31, 2012

Easter Countdown Calendar


Inspired by this idea found via pinterest


Yesterday my mind just couldn't rest until I had made this easter countdown.

I had all necessary items except little magnets. A quick trip to the shop fixed that!

It's a very simple idea but I think will work well.


--------------

These plastic eggs are quite large{around 8cm tall}. The only size that Woolworths was selling. Which is perfect because I hope to squeeze four treats into each egg! Countdown calendars can be tricky for big families! {I wonder what people with LOTS of kids do?}

Basically hot glue gun a magnet onto the back of each egg.

Add numbers, stickers, decorate each egg.
{I looked for easter stickers and found none. Last year I saw lots!?! - so ours are plain}

Attach to your fridge and you have an instant Easter Countdown!

Fill with daily activities, scriptures and treats!


*** UPDATE
It seems my glue peeled off easily from the plastic eggs that were filled too heavily. So I covered the magnets with tape as well to ensure the eggs didn't come apart/fall off the fridge.


We've changed the direction of ours so it starts at 7 so when each egg is used you know how many days are left to easter - We changed our christmas countdown last year.. made it easier to tell there was 15 days to go etc...


some ideas:

Palm Sunday activities
{we get palm leaves from our neighbour and wave them around and make palm crosses}
Dye Eggs
Make Easter Cards for Grandparents and family and friends
Make Chocolate Easter Nests
Make Hot Cross Buns
Do a Passover Dinner
Egg Hunt
Watch Easter Movie

Thursday, March 29, 2012

Easter Grass


Our Easter grass is done and grown. I think we even have time to grow a little more. Personally I want to try this one


How to grow Wheat Grass

I purchased my wheat grains from a health food store. Cost me all of 30 cents! You can grow wheat grass on paper towel without dirt if you wish! Here is how we did ours.

Place a thin layer of dirt in a dish/container. You can line it with plastic wrap if you wish esp if you are growing it in a cardboard container. Place wheat berries all over the dirt. You can bury them, we did a little of both, some under the dirt some above.

Water every day! I placed a water bottle mister/sprayer next to the dirt. The girls were to spray it three times a day {It got sprayed a lot more than that! Just too hard to resist for little girls!}

The wheat will sprout within one day! I swear that stuff grows while your back is turned. I really felt like it was an alien thing growing growing. It was almost creeping me out! {can you tell we don't do living things often?} One day it grew one centimeter within a couple of hours! We didnt keep exact measurements but if you keep a ruler near by the children could measure it as it grows.

To extend the life of the wheat grass trim it regularly.

Here is how ours grew in only ONE WEEK.


I had someone ask me: What the heck is easter grass and what do you do with it and why?

If you need some justification in you life {I often do} here are some reasons:

:: watching seeds grow gives room to talk about new life.
For christians Easter is the ultimate time to talk about life, death and life after death.

:: Even though it is not spring here for many people it is.
After a cold winter some lovely greenery in the home is welcome.
I also told my children that chicks, bunnies and plants are used at Easter as it was spring when The first Easter occurred, even though it is not here.

:: Easter Bunny believers will love leaving it out as a fresh snack for their visiting bunny

:: I've seen people use it in easter baskets instead of the plastic/paper fake grass
It's alot cheaper and is natural and will compost.

:: Makes great table centre pieces

:: Wheat grass takes about a week or so to grow.
Children can anticipate the coming of easter while looking after their grass.

:: All my school age children have been following lifecycles at school this term. They have grown grass heads, alfalfa sprouts, tadpoles. Another example at home is always good and they wanted to take it to school to show how much faster it grew than the school ones!


Enjoy creating different scenes with your Easter Grass! Ever evolving.


*note do not leave inclosed for long periods of time. I left my cake stand dome over the grass for a couple of days and spider web like mould started to grow. Wheat grass likes air! Wheat grass will be perfectly fine if covered for a few hours though if using for table decoration.
Related Posts Plugin for WordPress, Blogger...