Showing posts with label Kids Craft. Show all posts

Thursday, June 23, 2016

TEN {Sequin Birthday Shirt}


Each year we make a birthday shirt. Just to mix it up a bit I ocassionaly trial different types.

This year we tried sequins! I had sequin ribbon here and shirt was $3 from Target. Done!

Sequins were a bit more fiddly to work with than I thought - you have to do a stitch behind every sequin to 'capture' the thread holding them together. My writing turned out a bit wonkier than I wanted as they moved around a bit while sewing but Miss 10 was happy with the outcome.

^^ Heres an example that I was working on laying out the ribbon in running writing. Turned out this shirt was too tight. Lucky we checked before I spent all the time sewing the ribbon!


Previous Birthday Shirts:


Letters {ONE} Birthday Shirt

Felt and Fabric Birthday Shirt

Ribbon Birthday Shirt

Reverse Applique Birthday Shirt

Zig Zag Stitched Birthday Shirt 

Spotty Reverse Applique

2 Birthday Shirt

Recycled Corderoy Pants 5 Birthday Shirt

Felt and Fabric double layer 10 Birthday Shirt

Felt Cat and Reverse Applique 11 Birthday Shirt

Felt Snowflake and Stitched #6 Birthday Shirt

Bleached Out Number Shirt


Saturday, June 13, 2015

Fabric Marker {Number Birthday Shirts}


I saw this idea this week for a Personalised Letter Shirt and thought perfect for our birthday shirts.

Which is lucky as I was just thinking this week I need to get onto that.

There are birthdays coming up!

And how lucky that we could use the same stencil. We have a 9 and 6 year old!


Buy a plain white Tshirt.

Print out a number

Use a Stanley knife to cut out the number.

Stick Stencil onto shirt

Use fabric markers to decorate


I didn't have any contact but laying a piece over the hole and then cutting the number out leaving a small border so it will stick onto your shirt would be perfect. I used sticky tape to create a little sticky border to help it stick on the tshirt, as I knew the kids wouldn't be able to keep the stencil on the shirt without moving. We also used double sided tape to stick down the circle in the middle of the 9/6

We placed a piece of cardboard between the layers of the shirt so it didn't bleed through and to give a hard surface to draw on.

Using Fabric markers (our local store was sold out of felt markers, so we had to use fabric crayons) draw lines all over the stencil. Our tshirt stretched a bit - catching on the crayons. I helped by keeping the tshirt firm in place.

When you lift off the stencil you should have a lovely number left behind.


When I said I wanted to photograph them the girls went and styled themselves like this:


Previous Birthday Shirt Ideas:


Paint Stencilled Birthday Shirt

Letters {ONE} Birthday Shirt

Felt and Fabric Birthday Shirt

Ribbon Birthday Shirt

Reverse Applique Birthday Shirt

Zig Zag Stitched Birthday Shirt 

Spotty Reverse Applique

2 Birthday Shirt

Recycled Corderoy Pants 5 Birthday Shirt

Felt and Fabric double layer 10 Birthday Shirt

Felt Cat and Reverse Applique 11 Birthday Shirt

Felt Snowflake and Stitched #6 Birthday Shirt

Bleached Out Number Shirt

Saturday, February 7, 2015

Easy Bubble Ink Valentines


I was at a party once commenting on someone's food was they bought along.

Where did you get that idea I stated

They looked at me like... ummm your blog...

Oh really, can't remember that one!! Ha!


Something similar happened this week I was perusing my backlog's on valentines and came across this from 2009 - Can't remember ever doing that and I thought - what a good idea.

The kids were into it so we did it again. This is a VERY EASY craft. We don't have many art supplies so I love easy and CHEAP art ideas. This idea was basically FREE.


Place some pink or red food colouring, drop of detergent and a little water in a cup.
Using a straw blow bubbles.

Place paper on top of the bubbles. {the bubbles with burst quickly}
Blow more bubbles and repeat. {get the kids to do it}
You'll probably have to do it 10 times to fill a piece of A4 paper.

The result is so pretty and delicate. Almost like marbling.


Use hearts to write individual statements about what you love about the people you love and place in a jar or around the house. We will use some for Family Home Evening Lesson.
 
I love to sew paper, sew hearts together for garlands and hang over door ways
 
Make cards for those you love.

Saturday, December 14, 2013

Christmas Tree Pinata


Each Christmas we make a new piñata.

I'm already dreaming of next years {awesome no?}

I thought of going super basic this year and wrapping a box to make a 'present piñata'
{awesome, Yes?}

But I've been thinking of doing a tree for a while now so Tree won out.


Here is how to make a Christmas Tree Pinata. This one came together fairly quick (2 hours)


Find a box (I've had a building skip next door for months - Easy to find boxes! yay!)

Draw a Tree shape. I went basic, just two levels. Trace and a make another copy.

Cut out your two Tree shapes.

Using left over cardboard cut long rectangles. Attach these to one of the trees using lots of tape.

Continue till you have attached a rectangle along all edges of the tree shape


Attach a hook. I used some wire and poked through the point of the tree.

Reinforce this area LOTS (first place to rip on a piñata is often the point of hanging/hook) with tape.

Leave a small gap untapped to push lollies/small toys into or fill now before you close it up


Attach the other tree on the top.


Cut crepe paper into strips.

Fringe the strips by making lots of cuts into the strip but do not cut all the way through when you undo it you will have a fringed streamer.

Attach the fringe to the piñata in rows starting from the bottom up.

Let Dry.

Decorate.


And you have a Christmas piñata to take to your awesome Christmas Party.


Here are some of our previous Christmas piñata's.


Candy Cane Pinata

Christmas Stocking Pinata

Bauble Pinata


Friday, July 15, 2011

Mittens


More sewing with K.

Now, not a lesson persay, but more a child led

'I wanna sew some gloves....'

So I have no tutorial or the like for you.

Basically it started with an outline of her hands on some polar fleece materal and she wanted to sew some gloves. I think after we cut it out she realised how hard it would be to sew around all those fingers, so I suggested how about mittens?

So with a basic trace of her hand and thumb she was able, with a little help, to sew the curved lines of some mittens

(she needed me near by to remind her to sew slowly and to stop and lift the foot and shift the direction of the mitten to obtain the curve shape)

Once she was done though I thought this was a simple sewing exercise I could share with those who also want to teach their children to sew.

Except now all her sisters and friends at school want a pair :/

Wednesday, July 6, 2011

Foam-erators


A sunny warm yet windy cool Winters Day.

Also the first day were we haven't had anything planned.

I actually thought we might not get to any of the crafts/ideas I listed for things to do on the holidays.

The kids have been totally fantastic at making their own fun so far this holidays.

But we didn't have anything to do so I thought we would make bubble foam makers.
(idea  sourced from Betz White)

These are EASY PEASY and lots of fun.


Take some plastic water bottles

Cut off the bottom

Find an old towel or facecloth and cut a square bigger than the bottom of the bottle

Using a rubber band (or string if like us you DONT HAVE ANY RUBBER BANDS)
secure the towel to the bottom of the bottle.

Dip bottle into a mix of detergent and water in a bowl

AND BLOW!!


(remind small children to breath in first before they put their lips to bottle, otherwise they will get a mouthful of soapy foam)

Super foamy snakes everywhere

Friday, June 24, 2011

Winter Holiday Inspiration


oh its that time again.

HOLIDAY TIME

(did I just groan?)

What I know to be true is that holiday time goes much more swiftly and nicely when I am prepared.


Why is this even a shock?

However with budget constraints holidays are not a time to give in to my girls every dreams and desires of movies, themeparks, insert anything that costs a bajillion dollars for a family of 6.

I just hate that prepared seems to = lots of money.


So I'm trying to devise a list of things to do at home - you know STAYCATION?
I like the tick box idea in the photo above. Or if I keep the list to myself then I can change what we are doing each day depending on how I'M feeling (it's all about me isnt it??)

So some ideas to keep us from killing eachother on the holidays

:: Make several batches of playdough
I'm thinking this rainforest idea , or this volcano/dino idea or this mermaid one

:: Paint hunks of wood leftover from our bikeracks and make blocks
how about these city scape ones?

::Play Forts using this technique (smart hey?)

:: Winter crafts - snowflakes, snowmen,

::visits to the park

:: have another crack at making a  Play Tree house (this one is so awesome and just hot glue gunned!)

:: Learn to Knit (who wants to teach my girls?)

:: Make an outdoor firepit and roast some marshmallows

:: Open Ended PaddlePop stick sculpture

:: Fly our kite

:: Make potions for our jar collection (fairy potion, life potion, magic potion.. the list is endless)

:: Go to movies

:: Iceskating

:: Science experiments

::Visit confectionary warehouse to buy a box of lollies for the girls to sell (their first job?!!)

:: Aluminium foil river

:: Cardboard Box Doll Houses


Here are a few activities from my archieves we might try again.

:: Make an Ice Wreath

:: Spray Bottle Painting

:: Homemade Marshmallows

:: Shadow Puppets

:: Awesome Newspaper Dome


I've had such a busy week this week that for last few days I have actually been looking forward with hope to the holidays. Let's pray I don't change my mind by Tuesday :)


Enjoy.. and tell me your holiday ideas...

Wednesday, June 15, 2011

Sewing lessons for kids.


oh it's hard not to forget your older children sometimes.

I think yay! finally they can look after themselves without bothering me a million times a day, bathe, get themselves food etc. My job is done!

But oh there is so much to teach them and when I am  all wrapped up in my toddlers I often leave the older ones to their own devices. Only lately I've realised they aren't progressing anywhere fast. There are new skills they should be learning but  I'm too tired to teach them. The wonderful little darlings are regressing and being less helpful than the smaller children! oh upcoming teenagerhood!

On Saturday I found myself with N asleep and the other two girls out with Daddy.

Finally! I thought. Alone time Time with K. Time to get on with teaching her some sewing lessons.

Ever since I read about these simple sewing lessons over at Chocolate on my Cranium I've been wanting to do them with K. K has sewn a pillowcase and toy dog blanket before, so she has touched the sewing machine, but I had not given her any tips or how to's really.

Using the sewing lesson guide,  K

Did Zig Zag stitch changing the length, width and tension every 5 cm's or so
Did every stitch on the machine
Learnt how to thread the machine
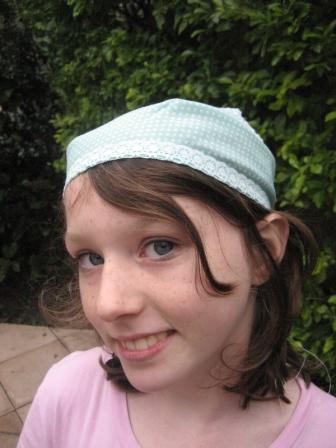
Made herself a little triangle head scarf


no matter how many times I tell them, my girls all prefer to wear scarves 'the babushka way'


She was very excited and I was excited to teach her a skill that may come in useful one day.

Like sewing your own formal dress ;)


I'm finding it hard to keep up with teaching K things on the chores at what age list because she is really not interested in doing much. (Which is EXACTLY why I need to teach her, but why does it have to be such a challenge/hard work to get kids to do things?!)

Well one thing down (lets look at it positively hey?) many more to go..

Friday, April 1, 2011

Easter Tree


It's april 1st! And I succeeded in our first Easter Tradition.

I decided that the first thing we would do for our month long celebration was an Easter Tree.
Throughout the month we will add more things to it.


It was exciting to get down our box of Easter things. I think last year was the first time I had anything worth keeping until 'next year'. We dusted off our Easter Egg Wreath and attached it to the door too.

G declared it "It's like NEW CHRISTMAS" which she repeated over and over.

And I have to agree. It is.

Easter is all about new and eternal life.


I'm sure I don't need to write a how to, but I will anyway :)

Find branches, twigs etc from your yard (or someone else's yard ;) and paint white


Arrange in a jar or vase. Be sure to anchor it down with something if it needs - rice, playdough, sand etc.

Is it bad that the frame behind is a left out christmas decoration? (a nativity papercut made by me)

Decorate and Enjoy And see how long it lasts.

N was only around 8 months old last Easter. She seems very interested in it all :S

Friday, March 11, 2011

From the Archives Friday - Redo and Crazy Hair


It's been about a year since we did this

Last week I saw similar on Color me Katie and remembered when we did the same.

I had bought Miss K some super cute Pikachu post it notes at a local asian cutesy store for her birthday and I knew they would be perfect to leave around the neighbourhood.

Also a fun activity for the girls to do with a friend on a friday afternoon.

I gave them the camera and let them go at it.


I hope they brighten someones day

(And not just destroy the environment - which I worry about :) or teach my kids to be vandals, which I also worry about :)  Hopefully the good feelings from sharing love will prevail.)

You are Loved


On an unrelated sidenote it was crazy hair day at school to raise money for cancer.
They had to pay $1 for each streak of coloured hairspray.
This is how they left for school.


Hopefully not channelling Amy Winehouse. Another thing I worry about :)


Funnily enough these looks were not hard to manage for my girls ;)

Monday, February 14, 2011

Hearts


SO I'm not very good at blogging about holiday stuff in advance.

I've seen several valentines ideas I've wanted to do especially this one but have not got around to them (ahh birthdays and wedding anniversaries getting in the way)

We did however do this one. Except me telling you know is kinda moot.
These babies take 24 hours to 'dry out' ... however there is always next year right?

So as conversation hearts can be kinda hard to come by here we made our own!
Minus the conversation part. We were going to write words on them with food colouring but just didn't get around to it!

I found the recipe here at Make Monthly.

It's basically water, icing sugar, geletin, corn syrup
(I googled and found that golden syrup or honey can be used as a substitute as corn syrup is hard to find here - I've had my bottle for months.. I never use it :)


It was kinda fun and the little kids kept thinking we were making playdough.


So we made enough for the girls to take to school and share out with all those they love.
(ie the whole class)


The girls have put in an order for lasagne, heart shaped bread and heart meringues for fancy dinner night tonight xx
Related Posts Plugin for WordPress, Blogger...